5. 플레이어
이 게임을 대략적으로 분석해 보겠습니다.
플레이어 역할(컨트롤) : 코스트를 소모하여 적을 막는 타워 배치, 업그레이드, 카메라 줌인, 줌아웃 이동
클리어 조건: 경로를 따라 지나가는 적들을 처치하여 막기
실패 조건: 일정 수의 적이 목표 지점에 도착
이에 필요한 것은 크게 3가지로 추려서
1) 타워 코스트 (여기서는 골드)
2) 타워 (적 공격, +업그레이드)
3) 플레이어 라이프 (적을 놓칠 수 있는 횟수)
4) 카메라 컨트롤
public class PlayerStatus
{
    public static int curretStage;
    public static int maxStage = 20;

    // 플레이어 소지금, 입출금에 쓸 수 있는 메서드
    static int gold = 400;
    static  int startGold = 400;
    const int cheatGold = 100000;
    public static void SetGold(int num) => gold = num;
    public static int GetGold() => gold;

    // 치트를 테스트에 쓸 경우 bool로 사용 여부를 하나로 묶어서 관리할 것!!!
    public static bool isCheatEnabled = true;
    public static int UseCheat() => isCheatEnabled ? gold += cheatGold : gold;


    // 플레이어 라이프, 라이프 변화 여부
    static int life=10;
    static int startLife = 10;
    static bool lifeChanged = false;
    public static void SetLife(int num)
    {
        if (life != 0)
            SetLifeChanged();
        life = num;
    }
    public static int GetLife() => life;
    public static void SetLifeChanged() => lifeChanged = !lifeChanged;
    public static bool GetLifeChanged() => lifeChanged;

    // 스폰 웨이브
    static int round = 0;
    static int startRound = 0;
    static int roundMax = 25;

    public static void SetRound(int num)
    {
        if (num > roundMax)
            round = roundMax;
        else
            round = num;
    }
    public static int GetRound() => round;

    // 게임 재시작 때 모든 스테이터스를 원래대로
    // 모든 터렛, 총알, 적 파괴
    // 라이프, 골드, 라운드, GameManager의 isPlayerAlive
    public static void Initialize()
    {
        life = startLife;
        gold = startGold;
        round = startRound;
        GameManager.isPlayerAlive = true;
        GameManager.isLevelCleared = false;
    }
}
게임 실행 도중 계속 유지할 파라미터들을 static으로 선언하고 여기에 모아두었습니다.
골드, 플레이어 라이프를 가지고 있도록 하겠습니다.
스테이지, 웨이브에 대한 정보도 여기에 있습니다.
using UnityEngine;

public class GameManager : MonoBehaviour
{
    // true : 게임 중, false : 게임 끝 -> 게임 오버가 될 때 처리하는 모든 곳에 트리거로 쓸 수 있음
    public static bool isPlayerAlive;

    // true : 마지막 웨이브까지 클리어, false : 게임 진행 중
    public static bool isLevelCleared;
    // Start is called before the first frame update
    void Start()
    {
        PlayerStatus.Initialize();
    }

    // Update is called once per frame
    void Update()
    {
        // 라이프가 0이 될 때 1번만 게임 오버 처리
        if (PlayerStatus.GetLife() <= 0 && isPlayerAlive)
        {
            Debug.Log("Game Over");
            isPlayerAlive = false;
        }
    }
}
게임 매니저를 만들어 게임 클리어, 패배 상태를 구분하였습니다.
using UnityEngine;

public class CameraControl : MonoBehaviour
{

    // 카메라 이동 속도 조절용 변수
    // 전후좌우 이동 속도
    float moveSpeed = 10f;
    // 줌인, 줌아웃 속도
    float zoomSpeed = 300f;

    // 화면 상하좌우 끝 부분을 나타내기 위한 위치 기준값
    float ScrollStartingPosition = 10f;

    // 줌인 줌아웃 최댓값
    float zoomInMax = 10f, zoomOutMax = 80f;

    // 화면 범위 (x,z) =>  (0,0) ~ (Screen.width, Screen.height)

    // 카메라 시점 고정 On/Off : 기본은 off
    bool isCameraLocked = true;

    // Update is called once per frame
    void Update()
    {
        // 플레이어 라이프가 0이 된 이후는 카메라 조작 불가
        if (!GameManager.isPlayerAlive)
            return;
        // 치트가 사용 가능할 때
        if (PlayerStatus.isCheatEnabled)
        {
            // P키를 누르는 순간, 10만 골드 추가 치트 사용
            if (Input.GetKeyDown(KeyCode.P))
            {
                Debug.Log("Cheat Actived : Add Gold");
                PlayerStatus.UseCheat();
            }
            // Delete를 누르는 순간, 클리어 스테이지 저장 값 초기화
            if (Input.GetKeyDown(KeyCode.Delete))
            {
                Debug.Log("Cheat Actived : Clear Data Initialize");
                PlayerPrefs.SetInt("maxClearedStage", 0);
            }
            // 백스페이스를 누르는 순간, 해당 스테이지 클리어
            if (Input.GetKeyDown(KeyCode.Backspace))
            {
                Debug.Log("Cheat Actived : Level Clear");
                GameManager.isLevelCleared = true;
            }
        }
        // ESC 키를 누르는 순간
        if (Input.GetKeyDown(KeyCode.Escape))
            // 카메라 움직임 고정 ON/OFF 토글
            isCameraLocked = !isCameraLocked;
        if (isCameraLocked==false)
        {
            // 전후 이동과 좌우 이동 조건문을 따로 떼어놓아 대각선 이동도 가능하게
            // 카메라 전(W 혹은 스크린 위로 마우스 위치), 후(S 혹은 스크린 아래로 마우스 위치) 이동에 대한 처리
            if (Input.GetKey(KeyCode.W) || Input.mousePosition.y > Screen.height - ScrollStartingPosition)
                MoveCamera(Vector3.up, moveSpeed);
            if (Input.GetKey(KeyCode.S) || Input.mousePosition.y < ScrollStartingPosition)
                MoveCamera(Vector3.down, moveSpeed);

            // 카메라 좌(A 혹은 스크린 좌측으로 마우스 위치), 우(D 혹은 스크린 우측으로 마우스 위치) 이동에 대한 처리
            if (Input.GetKey(KeyCode.A) || Input.mousePosition.x < ScrollStartingPosition)
                MoveCamera(Vector3.left, moveSpeed);
            if (Input.GetKey(KeyCode.D) || Input.mousePosition.x > Screen.width - ScrollStartingPosition)
                MoveCamera(Vector3.right, moveSpeed);

            // 마우스 휠로 줌인, 줌아웃
            // mouseScrollDelta는 Vector2 값을 반환하나 x는 무시
            // 따라서 y값만 쓰고 휠을 위로 굴릴 경우 양, 휠을 아래로 굴릴 경우 음

            // 마우스 휠을 위로 굴리는 경우
            if (Input.mouseScrollDelta.y > 0) // 혹은 Input.GetAxis("Mouse scrollWheel")
            {
                // 최대 ZoomIn을 벗어나지 않는 범위 내에서 줌인
                if (transform.position.y > zoomInMax)
                    MoveCamera(Vector3.forward, zoomSpeed);
            }
            // 마우스 휠을 아래로 굴리는 경우
            else if (Input.mouseScrollDelta.y < 0)
            {
                // 최대 ZoomOut을 벗어나지 않는 범위 내에서 줌아웃
                if (transform.position.y < zoomOutMax)
                    MoveCamera(Vector3.back, zoomSpeed);
            }

            //transform.Translate(Vector3.forward*Input.GetAxis("Mouse ScrollWheel") * zoomSpeed * Time.deltaTime);
        }
    }

    // 매개변수의 방향, 속력에 따라 카메라 이동
    void MoveCamera(Vector3 direction, float speed)
    {
        transform.Translate(direction * speed * Time.deltaTime, Space.Self);
    }
}
카메라 컨트롤을 다뤘지만
배울 때 여기에 테스트를 편하게 해주는 치트도 넣었습니다.
6. 타워
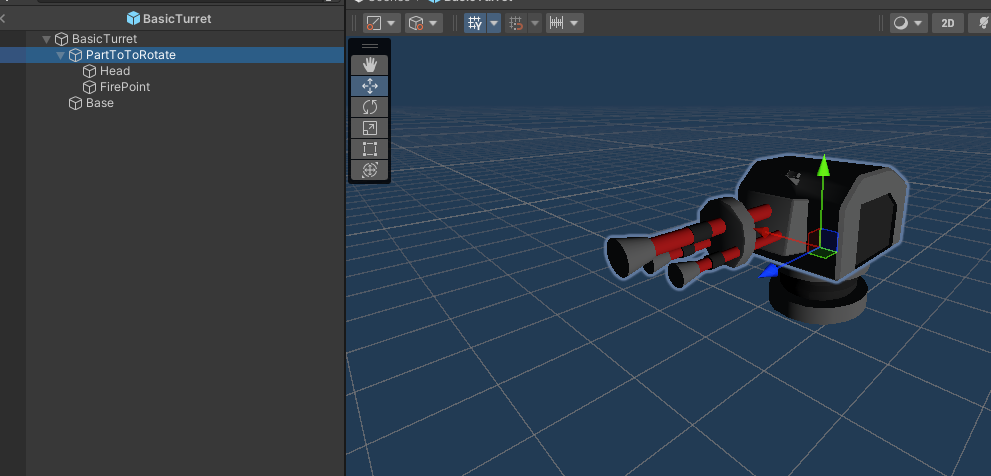

해당 게임에서 사용한 기본 타워의 프리팹 구성입니다.
해당 타워는 가장 가까운 적을 향해 주기적으로 단일 공격을 합니다.
기본 타워 이외에
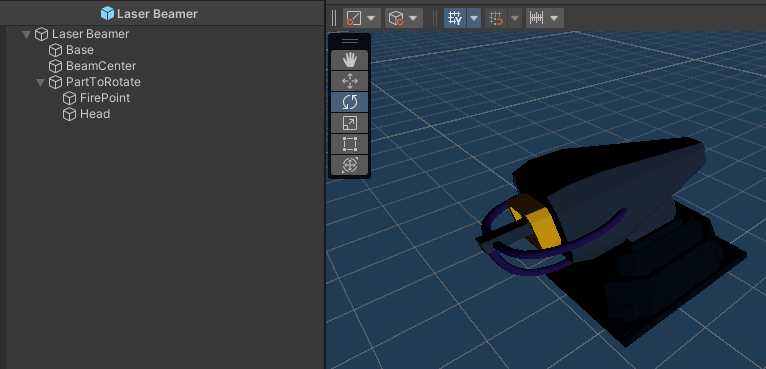
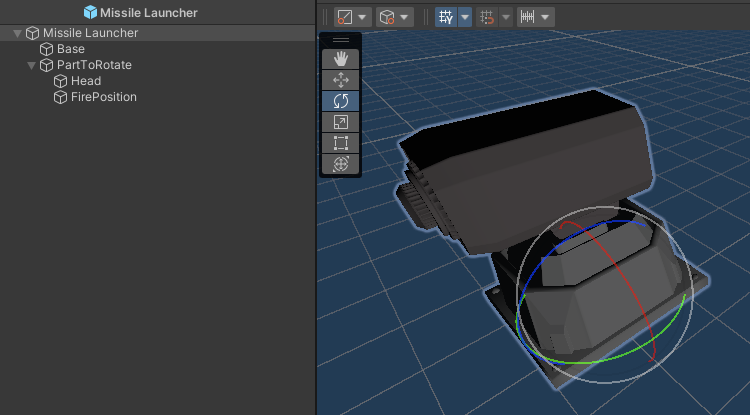
타워 3종류를 넣었습니다.
이 타워들이 작동하는데는 공통적으로 무엇이 필요할까요?
1) 외형 : 에셋을 통해 외형 모델링을 받아와 프리팹 생성 (GameObject)
2) 설치 타일과 맞닿는 위치 : Base (Transform >> Position)
3) 적 방향 바라보기 : 회전 속도, 회전할 부분 모음 오브젝트, 타겟 감지, 타겟을 바라보게 회전
4) 적 공격 : 사정거리, 공격력, 쿨타임, 탄환이 발사되는 위치, 적을 공격하는 탄(혹은 이펙트)
using System;
using UnityEngine;
[Serializable]
public class TurretBlueprint
{
    public GameObject prefab;
    public int[] price;
}
외형, 회전부, 바닥과 닿는 베이스 등이 조립된 게임 오브젝트
설치, 업그레이드 비용에 들어가는 비용
예전에 개발을 처음 배울 때 만들었던 구조라 만족스럽진 않습니다..
아마 지금 만든다면 아래 스크립트의 강화 단계별 스테이터스, 스케일도 위에 올려서 정리할 듯 합니다.
using UnityEngine;
using Fire;
public class Turret : MonoBehaviour
{
    // 각 강화 단계별 스테이터스 지정
    // Basic Turret
    float[] BasicTurretRange = new float[Shop.MaxUpgrade] { 15f, 20f, 25f };
    float[] BasicTurretTimer = new float[Shop.MaxUpgrade] { 1f, 0.75f, 0.5f };

    // Missile Launcher
    float[] LauncherRange = new float[Shop.MaxUpgrade] { 30f, 35f, 40f };
    float[] LauncherTimer = new float[Shop.MaxUpgrade] { 4f, 3.75f, 3.5f };

    // Laser Beamer
    float[] BeamerRange = new float[Shop.MaxUpgrade] { 30f, 35f, 40f };
    float[] BeamerTimer = new float[Shop.MaxUpgrade] { 0f, 0f, 0f };

    // 레벨에 따른 터렛 스케일
    Vector3[] ScaleTurretLV = new Vector3[Shop.MaxUpgrade] { new Vector3(1f, 1f, 1f), new Vector3(1.5f, 1.5f, 1.5f), new Vector3(2f, 2f, 2f) };


    //베이직 터렛 : 자신으로부터 가장 가까운 적
    private GameObject target;

    [Header("Attributes")] //인스펙터창 필드 정리

    float attackRange; // 공격 사정거리
    float timerFire;// 공격 딜레이
    private float fireCountdown = 0f;// 남은 공격 딜레이

    public GameObject bulletPrefab; // 해당 타워가 사용할 탄환 프리팹을 인스펙터 창에서 할당
    public Transform firePoint; //총알 발사 지점의 좌표
    // 회전 부위에 빔을 자식 오브젝트로 넣는 경우 이상하게 동작 -> 회전하지 않는 빈 오브젝트를 만들어 부모로
    public Transform beamCenter;

    [Header("Unity Setup")]
    //회전을 관리하는 오브젝트
    public Transform pratToRotate;

    // 레이저비머는 총알이 아닌 광선으로 공격하기 때문에 메커니즘이 다르므로 해당 변수로 판정
    bool isLaserBeamer;

    // 터렛의 회전 속도
    public float turnSpeed = 10f;

    GameObject bulletGo;

    Bullet bullet;

    public bool isUpgraded;
    int turretLV;

    bool isRotateCompleted;

    // 해당 터렛이 설치된 타일 오브젝트
    Transform parent;

    //BuildManager에서 생성한 후 1회 실행
    private void Start()
    {
        isRotateCompleted = false;
        // 해당 터렛의 부모 오브젝트인 설치된 타일을 받아옴
        parent = transform.parent;
        // 레벨은 0부터 시작 (최대 강화 수-1)까지
        turretLV = 0;
        // 생성한 타워의 종류에 따라 사거리, 공격 딜레이 설정
        SetTurretStatus();
    }

    // Update is called once per frame
    void Update()
    {
        // 게임 오버가 된다면 터렛 모두 파괴
        if (!GameManager.isPlayerAlive)
        {
            // 파괴가 없으니 설치 이펙트를 대신 호출하고 터렛 자신을 파괴
            EffectManager.NeedEffect((int)EffectManager.effectIndex.InstallEffect, transform.position);
            Destroy(gameObject);
        }

        // 타워가 업그레이드 되면 1번만
        if (isUpgraded)
        {
            // 레이저 비머가 빔을 발사하고 있는 경우 빔을 잠시 중단하고
            if (isLaserBeamer && bulletGo != null)
                Destroy(bulletGo);

            // 레벨 +1
            ++turretLV;
            // 레벨에 맞게 타워 크기 변경
            // -> 문제 발생! 크기를 키우면 부모, 자식 관계에 의해 크기가 이상하게 변경됨
            // 상속 관계를 잠시 풀었다가 스케일 변경 후 다시 상속
            transform.parent = null;
            transform.localScale = ScaleTurretLV[turretLV];
            transform.parent = parent;
            // 메테리얼 변경도 추가하자...


            // 레벨에 맞게 타워 스테이터스 변경
            SetTurretStatus();
            // 다음 레벨업 전까지 해당 구문이 동작하지 않도록
            isUpgraded = false;
        }
        // 자신으로부터 가장 가까운 타겟을 찾음
        SearchTarget();

        if (target == null)
        {
            isRotateCompleted = false;
            return;
        }

        //타겟의 움직임에 따라 터렛 헤드가 타겟 방향으로 회전한다
        LockOn();

        // 사격 쿨타임이 되었고, 터렛이 적을 바라보고 있을 때 발사
        if(fireCountdown <= 0f)
        {
            Shoot();
        }
        fireCountdown -= Time.deltaTime;
    }

    //발사
    private void Shoot()
    {
        // 레이저 비머라면
        if (isLaserBeamer)
        {
            // 빔을 발사하고 있지 않는 경우 빔 발사
            if (bulletGo == null && isRotateCompleted)
            {

                bulletGo = Instantiate(bulletPrefab, Vector3.zero, Quaternion.identity);
                bulletGo.GetComponent<LineRenderer>().startWidth = ScaleTurretLV[turretLV].y/10;
                bulletGo.GetComponent<LineRenderer>().endWidth = ScaleTurretLV[turretLV].y/10;
                bulletGo.transform.SetParent(beamCenter);
                bullet = bulletGo.GetComponent<Bullet>();
                bullet.SetFirePoint(firePoint.position);

            }
            // 빔이 존재하는 동안
            if (bullet != null)
            {
                // 빔의 시작 위치, 도착 위치를 지속적으로 보내줌
                bullet.SetFirePoint(firePoint.position);
                bullet.SetTarget(target.transform);
            }
        }
        else
        {
            if (isRotateCompleted)
            {
                bulletGo = Instantiate(bulletPrefab, firePoint.position, Quaternion.LookRotation(target.transform.position - transform.position));
                bulletGo.transform.localScale = ScaleTurretLV[turretLV];
                bulletGo.transform.SetParent(firePoint);
                bullet = bulletGo.GetComponent<Bullet>();

                if (bullet != null)
                    bullet.SetTarget(target.transform);
                fireCountdown = timerFire;
            }
        }
    }

    //타겟의 움직임에 따라 터렛 헤드가 타겟 방향으로 회전한다
    private void LockOn()
    {
        Vector3 dir = target.transform.position - this.transform.position;
        Quaternion lookRotation = Quaternion.LookRotation(dir);
        Vector3 rotation = Quaternion.Lerp(pratToRotate.rotation, lookRotation, Time.deltaTime * turnSpeed).eulerAngles;
        pratToRotate.rotation = Quaternion.Euler(0f, rotation.y, 0f);

        // 회전 값 오차 범위
        float errorRange = 2f;

        // y축 기준으로 회전하므로 y축 각도 값만 비교하면 된다
        if (pratToRotate.rotation.y > lookRotation.y - errorRange && pratToRotate.rotation.y < lookRotation.y + errorRange)
            isRotateCompleted = true;
        else
            isRotateCompleted= false;
    }

    //가장 가까운 적을 찾는다
    private void SearchTarget()
    {
        //[1]모든 Enemy들의 정보를 가져온다 - GameObject.FindGameObjectsWithTag
        GameObject[] enemies = GameObject.FindGameObjectsWithTag("Enemy");

        //[2]정보를 이용해서 모든 Enemy중에 가장 가까운 거리를 찾는다(최소값)
        float minDistance = float.MaxValue;
        GameObject nearEnemy = null;

        foreach (GameObject enemy in enemies)
        {
            //터렛과 enemy와의 거리를 구한다
            float distance = Vector3.Distance(transform.position, enemy.transform.position);
            //최소 거리와 비교하여 최소거리 보다 작으면 새로운 거리를 최소거리로 저장한다
            if (distance < minDistance)
            {
                minDistance = distance;
                nearEnemy = enemy;
            }

        }
        // 생성된 적이 있고, 가장 가까운 적이 공격 범위 안이라면
        if (nearEnemy != null && (minDistance <= attackRange))
        {
            // 가장 가까운 적을 타겟으로 설정
            target = nearEnemy;
        }
        else
        {
            target = null;
        }
    }

    //공격 범위 확인
    private void OnDrawGizmosSelected()
    {
        // 레이저 비머는 사정거리가 무한이므로 기즈모를 생성하지 않는다
        if (!isLaserBeamer)
        {
            Gizmos.color = Color.red;                               //기즈모 색 변경
            Gizmos.DrawWireSphere(transform.position, attackRange); //자신의 위치에서 공격범위만큼 설정
        }
    }

    public int GetTurretLV() => turretLV;

    // Tiles에서 업그레이드하면 1회 true 반환 -> 스테이터스 변화 후
    public bool isUpgrad
    {
        get => isUpgraded;
        set => isUpgraded = value;
    }

    void SetTurretStatus()
    {
        // 생성한 타워의 종류, 레벨에 따라 사거리, 공격 딜레이 설정
        // Basic Turret
        if (name.Contains("Basic"))
        {
            attackRange = BasicTurretRange[turretLV];
            timerFire = BasicTurretTimer[turretLV];
        }
        // Missile Launcher
        else if (name.Contains("Missile"))
        {
            attackRange = LauncherRange[turretLV];
            timerFire = LauncherTimer[turretLV];
        }
        // Laser Beamer
        else if (name.Contains("Laser"))
        {
            attackRange = BeamerRange[turretLV];
            timerFire = BeamerTimer[turretLV];
            isLaserBeamer = true;
        }
    }
}
위에서 이야기한 필요 요소들을 코드로 작성하였습니다.
+ 업그레이드한 타워에 시각적으로 차별점을 주기 위해 타워 스케일을 키웠습니다.
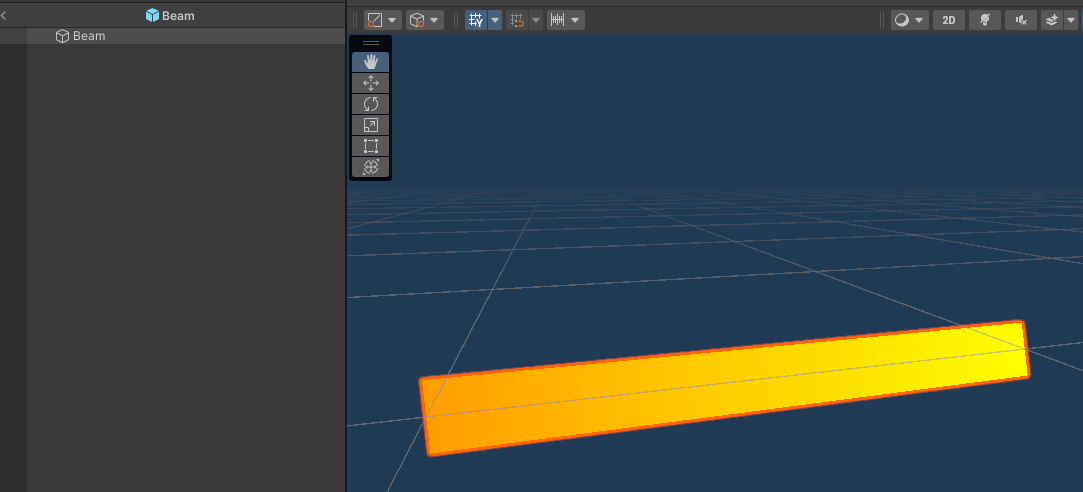
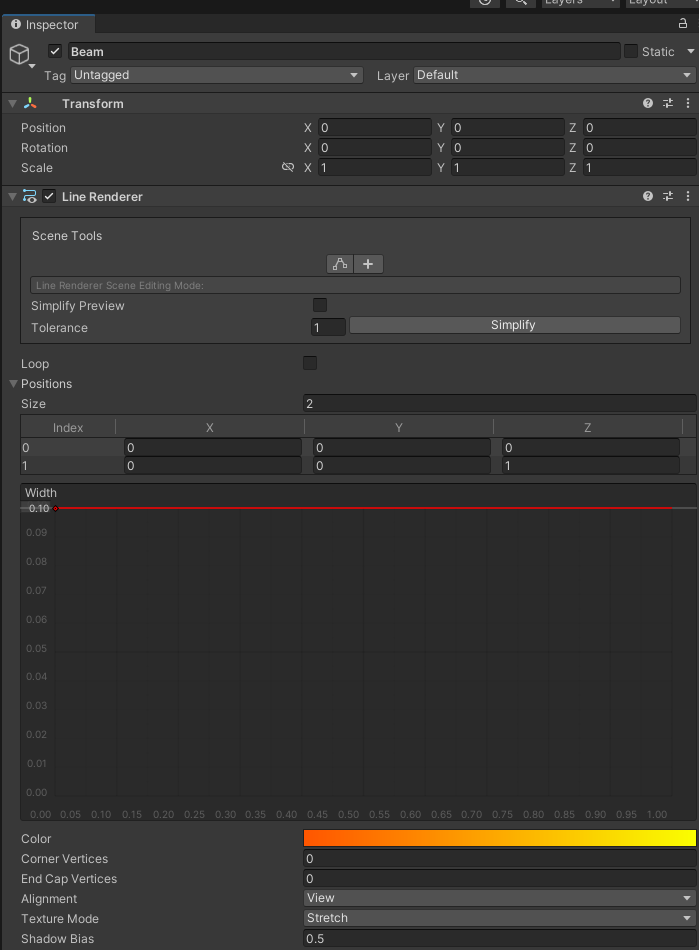
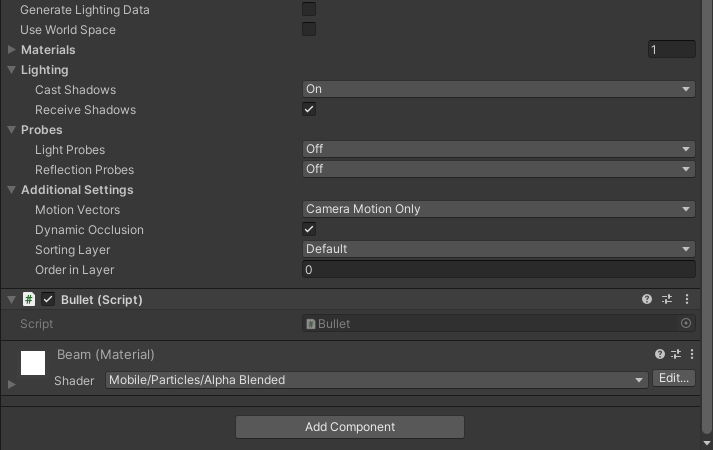
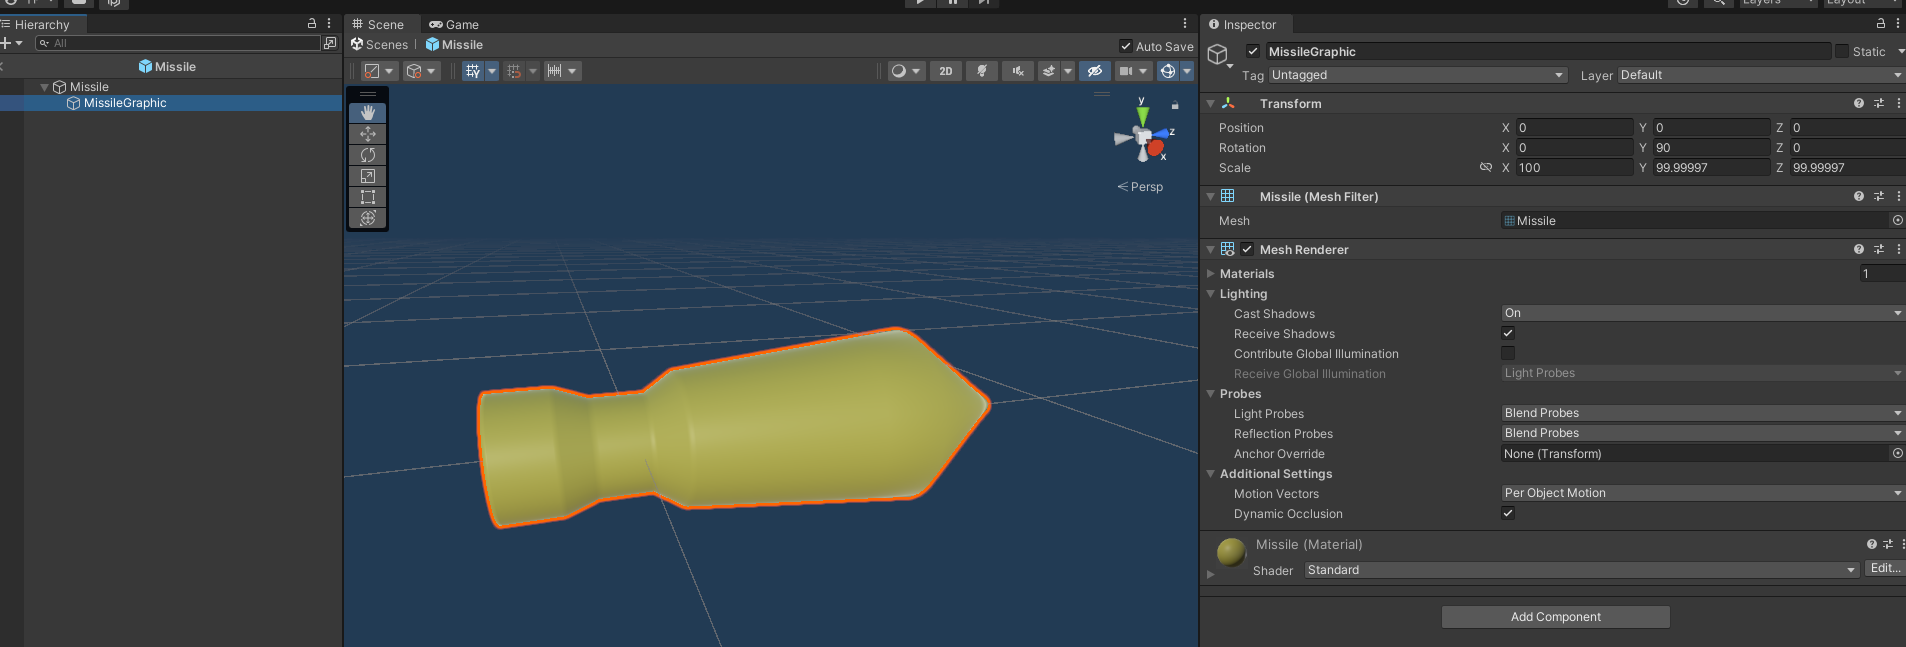
7. 총알
타워가 적을 공격하는 수단입니다.
각 타워에 대응하는 공격을 프리팹으로 생성해두고 공격 때마다 호출합니다.
1) 기본 타워
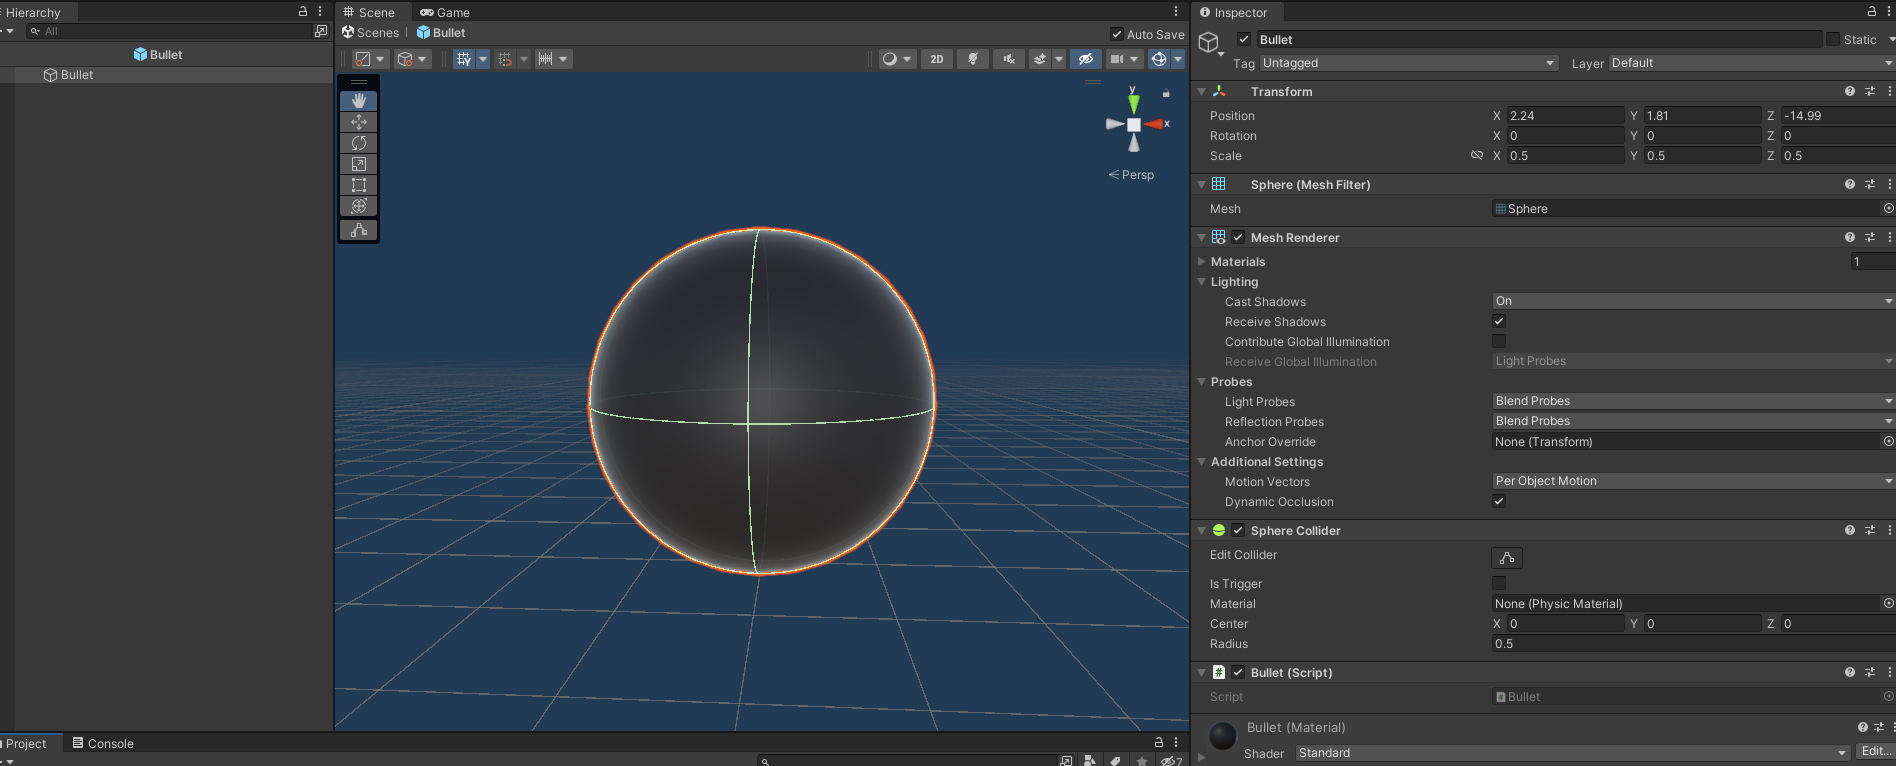
2) 레이저 빔
3) 미사일

using UnityEngine;
namespace Fire
{
    public class Bullet : MonoBehaviour
    {
        int[] bulletDamage = new int[Shop.MaxUpgrade] { 50, 60, 70 };
        int[] missileDamage = new int[Shop.MaxUpgrade] { 50, 60, 70 };
        int[] missileRange = new int[Shop.MaxUpgrade] { 7, 8, 9 };
        int[] beamDamage = new int[Shop.MaxUpgrade] { 30, 40, 50 };

        // 목표가 되는 적의 Transform
        private Transform target;

        // 투사체의 이동속도
        float moveSpeed;

        // 범위 공격 투사체의 폭발 반경
        float attackrange;

        // 1발 당 피해량
        float damage;

        // 투사체의 방향 회전 속도
        float rotationSpeed = 10f;

        bool isBeam;

        LineRenderer lineRenderer;
        // 빔의 발사지점
        Vector3 firePoint;

        int bulletLevel;

        // Start is called before the first frame update
        void Start()
        {
            // 공격 범위 기본은 0
            attackrange = 0;
            // 시작 시 부모인 터렛으로부터 레벨 받아옴
            bulletLevel = GetComponentInParent<Turret>().GetTurretLV();
            // 터렛의 레벨에 따라 각 bullet의 스테이터스 초기화
            if (gameObject.name.Contains("Bullet"))
            {
                moveSpeed = 70f;
                damage = bulletDamage[bulletLevel];
            }
            else if (gameObject.name.Contains("Missile"))
            {
                moveSpeed = 50f;
                attackrange = missileRange[bulletLevel];
                damage = missileDamage[bulletLevel];
            }

            else if (gameObject.name.Contains("Beam"))
            {
                lineRenderer = GetComponent<LineRenderer>();
                isBeam = true;
                damage = beamDamage[bulletLevel];
            }
        }

        // Update is called once per frame
        void Update()
        {
            // 게임 오버가 된다면 모든 총알 파괴
            if (!GameManager.isPlayerAlive)
            {
                Destroy(gameObject);
            }
            BulletCycle();
        }

        // 추상 함수는 public으로만 선언 가능
        public virtual void HitTarget()
        {
            //총알일 경우 해당 적만 대미지를 주다가 파괴
            if (gameObject.name.Contains("Bullet"))
            {
                if (target.CompareTag("Enemy"))
                {
                    // 총알이 명중한 이펙트 호출
                    EffectManager.NeedEffect((int)EffectManager.effectIndex.BulletImpact, transform.position);
                    // 대미지를 주어서 적의 체력이 0 이하가 되었다면
                    if (target.GetComponent<Enemy>().IsThisEnemyDied(damage))
                        // 적을 파괴한다
                        Destroy(target.gameObject);
                    Destroy(gameObject);
                }
            }
            // 미사일일 경우 공격 범위 내 적에게 대미지를 주다가 파괴
            else if (gameObject.name.Contains("Missile"))
            {
                // 타격 이펙트 생성 후 2초가 지나고 파괴
                EffectManager.NeedEffect((int)EffectManager.effectIndex.MissileImpact, transform.position);

                // 공격 범위 내 모든 충돌체들에 대해
                Collider[] enemies = Physics.OverlapSphere(transform.position, attackrange);
                for (int i = 0; i < enemies.Length; i++)
                {
                    // 그 충돌체들 중 Enemy 태그를 달고 있는 오브젝트가 있다면
                    if (enemies[i].gameObject.CompareTag("Enemy"))
                        // 대미지를 주고 체력이 0 이하가 된 적에 대해
                        if (enemies[i].GetComponent<Enemy>().IsThisEnemyDied(damage))
                            // 처치
                            Destroy(enemies[i].gameObject);
                }
                Destroy(gameObject);
            }

            // 빔일 경우 가장 가까운 적에게 슬로우 + dps를 주면서 파괴
            else if (gameObject.name.Contains("Beam"))
            {
                // 빔이 명중한 이펙트 호출 및 위치 조정
                // 다음부턴 이렇게 쓰지 않도록
                if (GameObject.Find("BeamEffect(Clone)") == null)
                {
                    EffectManager.NeedEffect((int)EffectManager.effectIndex.BeamEffect, target.position);
                }
                BeamManager.GeteffectRotation(firePoint - target.position);
                BeamManager.GeteffectPosition(target.position);


                // 타겟 적에게 빔에 맞고 있는 상태임을 알림 -> 맞는 동안 슬로우
                target.GetComponent<Enemy>().SetisAttackedByBeam();

                // 대미지를 주어서 적의 체력이 0 이하가 되었다면
                if (target.GetComponent<Enemy>().IsThisEnemyDied(damage * Time.deltaTime))
                {
                    // 적을 파괴한다
                    Destroy(target.gameObject);
                    // 적을 파괴하면 빔이 끊기게 함
                    Destroy(gameObject);
                }
            }
        }

        //매개변수로 _target을 받아 target을 저장
        //생성할때 터렛에 가장 가까운 적을 타겟으로 받아온다
        public void SetTarget(Transform _target)
        {
            target = _target;
        }
        public void SetFirePoint(Vector3 _firePoint)
        {
            firePoint = _firePoint;
        }


        //타겟의 움직임에 따라 탄환이 타겟 방향으로 회전한다
        private void LockOn()
        {
            Vector3 dir = target.transform.position - transform.position;
            Quaternion lookRotation = Quaternion.LookRotation(dir);
            Vector3 rotation = Quaternion.Lerp(transform.rotation, lookRotation, Time.deltaTime * rotationSpeed).eulerAngles;
            transform.rotation = Quaternion.Euler(0f, rotation.y, 0f);
        }
        void BulletCycle()
        {
            //이동중 타겟이 kill 될 경우
            if (target == null)
            {
                Destroy(this.gameObject);
                return;
            }


            // 빔의 경우 바로 적을 쏘도록
            if (isBeam)
            {
                // 레이저 출발점은 항상 firePoint로 고정
                lineRenderer.SetPosition(0, firePoint);
                // 레이저 도착점은 타겟 중앙점
                lineRenderer.SetPosition(1, target.position);

                HitTarget();
                // 이렇게 되면 락온이 필요하지 않음
                //LockOn();
            }

            // 다른 총알의 경우 날아가서 부딪힘
            else
            {
                //타겟 방향
                Vector3 dir = target.position - this.transform.position;
                // 타겟과 총알과의 거리
                float distance = Vector3.Distance(target.position, this.transform.position);


                //한 프레임에 이동하는 거리
                float distanceThisFrame = Time.deltaTime * moveSpeed;
                //남은거리가 한 프레임에 이동하는 거리보다 작으면 충돌이라고 판정
                if (distance <= distanceThisFrame)
                {
                    HitTarget();
                    return;
                }

                transform.Translate(dir.normalized * Time.deltaTime * moveSpeed, Space.World);
                if (gameObject.name.Contains("Missile"))
                    LockOn();
            }
        }

        private void OnDrawGizmosSelected()
        {
            Gizmos.color = Color.red;
            Gizmos.DrawWireSphere(transform.position, attackrange);
        }
    }
}
지금 보니 HitTarget()은 추상 함수로 선언했으나 오버라이드는 쓰지 않았네요
그냥 if문으로 처리했었습니다.
'Unity 3D > 디펜스 게임' 카테고리의 다른 글
| 타워 디펜스 (6) - 빌드, 게임 플레이 (0) | 2025.03.29 |
|---|---|
| 타워 디펜스 게임 (5) - 타이틀 씬, 레벨 선택 씬, 레벨 별 플레이 씬 (0) | 2025.03.28 |
| 타워 디펜스 게임 (4) - 이펙트 (0) | 2025.03.28 |
| 타워 디펜스 게임 (3) - UI, 타워 설치 (1) | 2025.03.27 |
| 타워 디펜스 게임 (1) - 맵, 적, 이동 경로 (0) | 2025.03.25 |